Kakao Developers
카카오 API를 활용하여 다양한 어플리케이션을 개발해보세요. 카카오 로그인, 메시지 보내기, 친구 API, 인공지능 API 등을 제공합니다.
developers.kakao.com
1. kakao developers 가입하기

2. 애플리케이션 추가하기

3. 앱 이름, 회사명, 카테고리 입력 및 서택 후 저장

4. REST API 키 확인하기

5. 플랫폼 등록하기
javaspring 로컬 서버주소 -> http://localhost:8080
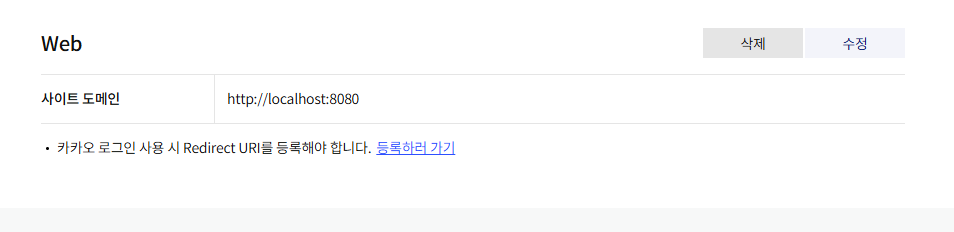
6. Redirect URL 등록하러가기

7. Redirect URL 등록

8. 동의항목 선택하기
(사용자의 정보 중 필요한 것만)

9. 문서 > 카카오 로그인 > 디자인 가이드 이미지 다운로드
const handleKakaoLogin = () => {
    window.location.href = "http://localhost:8080/oauth2/authorization/kakao";
};
<div className="Login_input" onClick={handleKakaoLogin} style={{ cursor: 'pointer' }}>
<img className="kakao_login_medium_narrow" alt="카카오 로그인" src="/kakao_login_medium_narrow.png" />
</div>10. 프론트엔드에서 버튼 클릭 시 링크 연동
dependencies {
    implementation 'org.springframework.boot:spring-boot-starter-oauth2-client'
}
11. 의존성 추가
OAuth2 인증을 자동으로 처리 가능
# Kakao OAuth2 ?? ??
spring.security.oauth2.client.registration.kakao.client-id=발급 받은 Rest_API Key 입력
spring.security.oauth2.client.registration.kakao.client-authentication-method=none
spring.security.oauth2.client.registration.kakao.authorization-grant-type=authorization_code
spring.security.oauth2.client.registration.kakao.redirect-uri={baseUrl}/login/oauth2/code/kakao
spring.security.oauth2.client.registration.kakao.scope=profile_nickname

spring.security.oauth2.client.provider.kakao.authorization-uri=https://kauth.kakao.com/oauth/authorize
spring.security.oauth2.client.provider.kakao.token-uri=https://kauth.kakao.com/oauth/token
spring.security.oauth2.client.provider.kakao.user-info-uri=https://kapi.kakao.com/v2/user/me
spring.security.oauth2.client.provider.kakao.user-name-attribute=id
12. application.properties 카카오 설정 추가
발급받은 developers REST API 키 입력
입력했던 developers Redirect URL 입력
package com.myfcseoul.backend.service;

import com.myfcseoul.backend.model.User;
import com.myfcseoul.backend.repository.UserRepository;
import org.slf4j.Logger;
import org.slf4j.LoggerFactory;
import org.springframework.security.oauth2.client.userinfo.DefaultOAuth2UserService;
import org.springframework.security.oauth2.client.userinfo.OAuth2UserRequest;
import org.springframework.security.oauth2.core.OAuth2AuthenticationException;
import org.springframework.security.oauth2.core.user.OAuth2User;
import org.springframework.stereotype.Service;
import org.springframework.transaction.annotation.Transactional;
import java.time.LocalDateTime;
import java.util.Map;

@Service
public class CustomOAuth2UserService extends DefaultOAuth2UserService {

    private static final Logger logger = LoggerFactory.getLogger(CustomOAuth2UserService.class);

    private final UserRepository userRepository;

    public CustomOAuth2UserService(UserRepository userRepository) {
        this.userRepository = userRepository;
    }

    @Override
    @Transactional
    public OAuth2User loadUser(OAuth2UserRequest userRequest) throws OAuth2AuthenticationException {
        logger.info("CustomOAuth2UserService.loadUser 호출됨.");
        OAuth2User oauth2User = super.loadUser(userRequest);

        Map<String, Object> attributes = oauth2User.getAttributes();
        logger.info("Kakao attributes: {}", attributes);

        // Kakao API 응답에서 "id"가 카카오 사용자의 고유 ID입니다.
        String kakaoId = String.valueOf(attributes.get("id"));
        logger.info("Extracted kakaoId: {}", kakaoId);

        // "kakao_account"에서 추가 정보를 추출 (이메일은 사용하지 않음)
        Map<String, Object> kakaoAccount = (Map<String, Object>) attributes.get("kakao_account");

        // "profile" 내에서 닉네임을 추출합니다.
        Map<String, Object> profile = kakaoAccount != null ? (Map<String, Object>) kakaoAccount.get("profile") : null;
        String nickname = (profile != null && profile.get("nickname") != null)
                ? (String) profile.get("nickname")
                : "Unknown";
        logger.info("Extracted nickname: {}", nickname);

        // DB에서 카카오 고유 ID(userId)로 사용자 조회, 없으면 새로 생성합니다.
        User user = userRepository.findByUserId(kakaoId)
                .orElseGet(() -> {
                    User newUser = new User();
                    newUser.setUserId(kakaoId);      // 카카오 고유 ID를 userId 필드에 저장
                    newUser.setNickname(nickname);
                    newUser.setCreatedAt(LocalDateTime.now()); // 🟢 이 부분 꼭 필요!
                    return newUser;
                });

        if (user.getNickname() == null || user.getNickname().isEmpty()) {
            user.setNickname(nickname);
        }

        logger.info("저장하기 전 User 정보: userId={}, nickname={}", user.getUserId(), user.getNickname());
        userRepository.save(user);
        logger.info("사용자 저장 완료.");

        return oauth2User;
    }
}
13. 로그인 성공시 사용자 정보를 받아서, DB에 사용자 생성/업데이트 코드 작성
package com.myfcseoul.backend.config;

import com.myfcseoul.backend.service.CustomOAuth2AuthenticationSuccessHandler;
import com.myfcseoul.backend.service.CustomOAuth2UserService;
import org.springframework.context.annotation.Bean;
import org.springframework.context.annotation.Configuration;
import org.springframework.security.config.annotation.web.builders.HttpSecurity;
import org.springframework.security.web.SecurityFilterChain;

@Configuration
public class SecurityConfig {

    private final CustomOAuth2UserService customOAuth2UserService;
    private final CustomOAuth2AuthenticationSuccessHandler successHandler; // 추가

    public SecurityConfig(CustomOAuth2UserService customOAuth2UserService,
                          CustomOAuth2AuthenticationSuccessHandler successHandler) { // 생성자 인젝션
        this.customOAuth2UserService = customOAuth2UserService;
        this.successHandler = successHandler;
    }

    @Bean
    public SecurityFilterChain securityFilterChain(HttpSecurity http) throws Exception {
        http
                .authorizeHttpRequests(authorize -> authorize
                        .requestMatchers("/", "/login**", "/error", "/css/**", "/js/**", "/images/**").permitAll()
                        .anyRequest().authenticated()
                )
                .oauth2Login(oauth2 -> oauth2
                        .userInfoEndpoint(userInfo -> userInfo
                                .userService(customOAuth2UserService)
                        )
                        .successHandler(successHandler) // 여기에 주입받은 successHandler 사용
                )
                .logout(logout -> logout
                        .logoutSuccessUrl("/")
                        .invalidateHttpSession(true)
                        .deleteCookies("JSESSIONID")
                )
                .csrf(csrf -> csrf.disable());

        return http.build();
    }
}
14. Spring Security에 CustomOAuth2UserService 등록
package com.myfcseoul.backend.service;

import jakarta.servlet.ServletException;
import jakarta.servlet.http.HttpServletRequest;
import jakarta.servlet.http.HttpServletResponse;
import java.io.IOException;
import org.springframework.security.core.Authentication;
import org.springframework.security.oauth2.client.authentication.OAuth2AuthenticationToken;
import org.springframework.security.web.authentication.AuthenticationSuccessHandler;
import org.springframework.stereotype.Component;

@Component
public class CustomOAuth2AuthenticationSuccessHandler implements AuthenticationSuccessHandler {

    // 성공 후 리다이렉트할 프론트엔드 URL
    private static final String REDIRECT_URL = "http://localhost:3000/";

    @Override
    public void onAuthenticationSuccess(HttpServletRequest request, HttpServletResponse response,
                                        Authentication authentication) throws IOException, ServletException {
        // 추가적으로 세션 또는 쿠키에 사용자 정보를 저장하는 로직을 넣을 수도 있습니다.
        response.sendRedirect(REDIRECT_URL);
    }
}
15. 로그인 성공 핸들러 구현
👑 전체 흐름 정리
✅ 프론트엔드 버튼 클릭
↓
✅ GET http://localhost:8080/oauth2/authorization/kakao
↓
✅ 카카오 로그인 페이지 → 사용자 로그인
↓
✅ Redirect → http://localhost:8080/login/oauth2/code/kakao
↓
✅ Spring Security 자동 처리 → Access Token + 사용자 정보 요청
↓
✅ CustomOAuth2UserService.loadUser() 실행
↓
✅ DB에 사용자 저장 또는 업데이트
↓
✅ successHandler → 프론트로 리다이렉트 (예: http://localhost:3000) 이동
후기
처음으로 카카오 로그인 api를 구현하려다보니 4시간 정도 소요하였다.
물론 회원가입을 카카오 api를 통하지않고
시스템 내에서 별도로 회원가입 기능을 구현한다면
익숙하여 더욱 쉬웠겠지만,
요즘 나도 그렇고 편의성으로는 카카오 로그인 API가 최고라고
생각하기 때문에 도전해보았다.
이제 다른 시스템 내에서 사용하게 된다면, 더욱 빠르게 가능할 것 같다.
'Spring' 카테고리의 다른 글
| [Spring] CaffeineCache TTL 설정 오류로 인한 NPE 발생 사례 (0) | 2026.04.29 |
|---|---|
| [Spring] 예외 처리 종류 & 상태 코드 (0) | 2025.12.28 |
| [Spring] 출금 및 장부 시스템 구현 (2) | 2025.12.08 |
| [Spring] 충전 기능 구현 with. TossPayments (0) | 2025.11.29 |
| [Spring] 웹소켓(STOMP) 을 이용한 채팅 구현 (0) | 2025.09.04 |


